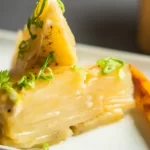
Root Vegetable Pave, a French culinary gem, is a dazzling dish that transforms ordinary root vegetables into a work of art. This exquisite creation involves thinly slicing an array of vibrant root vegetables, like potatoes, sweet potatoes, carrots, parsnips, and beets, which are then meticulously layered and baked to perfection. The result? A stunning, multi-hued masterpiece that’s as visually captivating as it is delicious.
What sets Root Vegetable Pave apart is its harmonious blend of flavors and textures, with each layer offering a unique taste experience.
Whether served as a show-stopping side dish or a hearty main course, this dish is a celebration of seasonal produce and an embodiment of French culinary finesse. Discover the magic of Root Vegetable Pave and elevate your dining experience with this delightful, nutrient-packed creation.
Ingredients
- 4-5 different root vegetables (such as potatoes, sweet potatoes, carrots, parsnips, and beets)
- 2-3 tablespoons olive oil
- Salt and pepper to taste
- Fresh herbs (rosemary, thyme, or sage) for garnish (optional)
Instructions
- Preheat your oven to 375°F (190°C).
- Wash, peel, and thinly slice the root vegetables using a mandoline slicer or a sharp knife. Ensure uniform thickness for even cooking.
- Grease a baking dish and line it with parchment paper.
- Start arranging the sliced vegetables in layers, alternating colors for an appealing presentation. Drizzle olive oil between the layers and season with salt and pepper as you go.
- Once you’ve filled the baking dish, cover it with foil and place it in the preheated oven.
- Bake for approximately 45-50 minutes or until the vegetables are tender when pierced with a fork.
- Remove the foil during the last 10 minutes of baking to allow the top layer to crisp up.
- Once done, let it rest for a few minutes before garnishing with fresh herbs, if desired.
Recipe Tips
- Use a variety of colorful root vegetables for a visually striking presentation.
- Don’t rush the slicing process; uniform thickness ensures even cooking.
- Experiment with different herbs and seasonings to customize the flavors.
Recipe Variations
- Cheesy Pave: Add a layer of grated cheese (such as Parmesan or Gruyère) between the vegetable layers for a gooey, indulgent twist.
- Spicy Pave: Sprinkle chili flakes or paprika between the layers for a spicy kick.
- Herb-infused Pave: Infuse the olive oil with fresh herbs like thyme or rosemary for extra flavor throughout the dish.
How to Store
- Refrigeration: Cover leftover Root Vegetable Pave tightly with plastic wrap or aluminum foil, place it in an airtight container, and refrigerate for up to 2-3 days.
- Freezing: For longer storage, wrap the Root Vegetable Pave securely in plastic wrap and foil, or place it in an airtight freezer-safe container. Freeze for up to three months.
How to Reheat
- Oven Reheat: To restore its crispness, preheat your oven to 350°F (175°C), place the frozen or refrigerated Root Vegetable Pave on a baking sheet, and bake for 15-20 minutes (frozen) or 10-15 minutes (refrigerated) until heated through and the top is crispy.
- Microwave Reheat: For a quick fix, use the microwave. Cover a portion with a damp paper towel to prevent drying, and heat in 30-second intervals until it’s hot.
- Stovetop Reheat: Heat a skillet over medium heat, add a bit of oil or butter, and carefully transfer the Root Vegetable Pave slices. Cook for a few minutes on each side until heated and crispy.
What To Serve With Root Vegetable Pave
- Grilled or roasted chicken breast for a complete meal.
- A fresh green salad with a light vinaigrette dressing.
- Creamy mushroom sauce for added richness.
- Garlic mashed potatoes for a comforting combination.
- Crusty artisan bread to mop up any delicious juices.
- A fruity chutney or cranberry sauce for a touch of sweetness.
Why You’ll Love This Recipe
- The combination of root vegetables creates a delightful medley of flavors and textures.
- It’s a healthy and nutritious option, packed with vitamins and fiber.
- Root Vegetable Pave is versatile and can be customized to your taste.
- It’s a great way to make the most of seasonal produce and reduce food waste.
Conclusion
Root Vegetable Pave is a culinary masterpiece that elevates humble root vegetables into a gourmet delight. Its layers of flavor, texture, and visual appeal make it a perfect addition to any dining occasion.
FAQs
What’s the best thickness for slicing the vegetables?
Slicing the vegetables to about 1/8 inch (3 mm) thickness works well for even cooking.
How do I prevent the top layer from burning?
Removing the foil during the last 10 minutes of baking will help the top layer crisp up without burning.
More Amazing Recipes
- Bill Miller Cornbread Dressing Recipe
- Tucci Benucch chopped Salad
- La Madeleine Pasta Salad Recipe
- Barefoot Contessa Orzo Salad with Cucumber
Root Vegetable Pave
Ingredients
- 4-5 different root vegetables (such as potatoes, sweet potatoes, carrots, parsnips, and beets)
- 2-3 tablespoons olive oil
- Salt and pepper to taste
- Fresh herbs (rosemary, thyme, or sage) for garnish (optional)
Instructions
- Preheat your oven to 375°F (190°C).
- Wash, peel, and thinly slice the root vegetables using a mandoline slicer or a sharp knife. Ensure uniform thickness for even cooking.
- Grease a baking dish and line it with parchment paper.
- Start arranging the sliced vegetables in layers, alternating colors for an appealing presentation. Drizzle olive oil between the layers and season with salt and pepper as you go.
- Once you've filled the baking dish, cover it with foil and place it in the preheated oven.
- Bake for approximately 45-50 minutes or until the vegetables are tender when pierced with a fork.
- Remove the foil during the last 10 minutes of baking to allow the top layer to crisp up.
- Once done, let it rest for a few minutes before garnishing with fresh herbs, if desired.
Welcome! My name is Emma and you are on my Internet Kitchen. Delicious food is the common love of every foodie person. This site is to share friendly and appetizing recipes. We believe for a better life, you should need better food. So, keep visiting for updated information and recipes.